Google Search Console Mega Guide
Google Search Console Mega Guide
Google Search Console is, in our opinion, the most underrated and under-used tool in SEO today. If you’ve been working in SEO for some time now, you probably know it as the Google Webmaster Tool, or Google Console.
Initially, Google Web Master Tool was known for its indexing features, and little else, but today, Google Search Console has evolved into a must-have weapon in your SEO arsenal
Why?
Because it offers a series of reports that are fundamental for SEO audits (which we’ll talk about later in this guide), it also connects with your Google Analytics panel and reveals extra data that is key to optimizing your SEO campaign and lastly, it can help you index your website’s content faster.
We’re going to take a look at Google Search Console rebranded version and how to make the most out of it for your website’s SEO efforts. Let’s begin!
How To Setup The Google Search Console

The first step, unsurprisingly enough is proving to Google you actually own (or at the very least have access) to this particular website’s server and files.
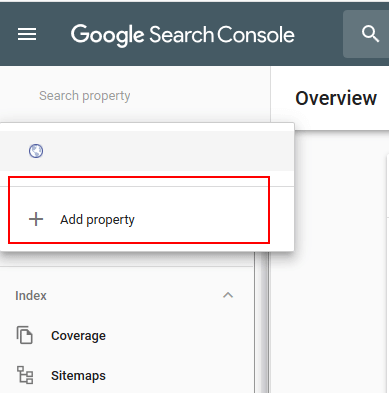
Login to your Google Search Console and click “Add a Property”
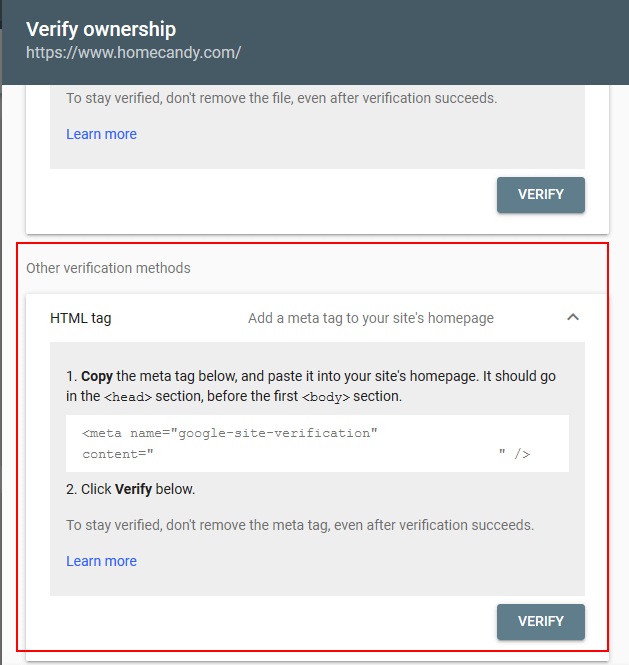
The easiest way to verify your site is to insert a HTML Code Snippet/Tag on your homepage.
You’ll be given a tag that needs to be inserted in the <head> section of your homepage’s code.
Next, Google is going to ask if you prefer your website’s URL to be prefaced by “www” or just your URL (www.blackhatlinks.com or blackhatlinks.com)
Google stated a while back that they may treat the www and regular version of your websites as separate properties and pages, so I highly suggest you specify a preferred domain in the Google Search Console settings.
I’d even go as far as setting up some 301 redirects from www links to your preferred URL. This will help you preserve all your backlinks effectiveness.
These neat little settings are part of the reason Google Search Console is so great: if you do a quick search, you’ll see that there’s no direct impact in picking a www or a non-www URL for your website, and that’s not entirely accurate.
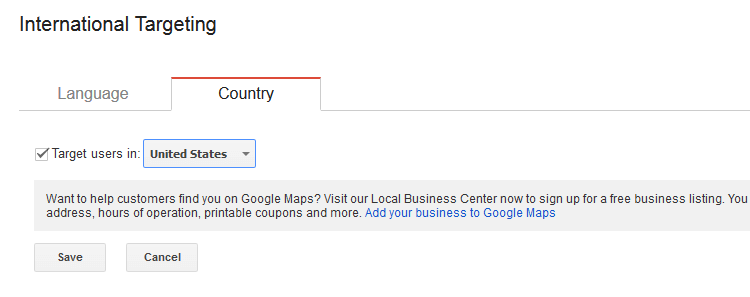
After that we’re going to pick a target country. We mentioned this step in our Ecommerce SEO Guide, since it’ll help you target local and effective traffic that might be interested in your products and services and leverage local ranking listings.
If you’re running an international online business, you can check your Google Analytics reports to see where most of your audience comes from. Pick that country and continue.
Note: if you skip this step, Google will automatically choose a country based on your server information and Google My Business listing. I highly suggest you don’t skip this step to avoid missing out on traffic opportunities.
Now it’s time to link your Google Analytics data with your Google Search Console dashboard.
One of Google Search Console lesser known hacks, is that you can get additional query information when you link both of these tools. This is particularly helpful when you want to uncover what kind of traffic you’re getting from keywords.
I’m going to assume you already have Google Analytics running on your website. If you don’t that’s okay, check out our Google Analytics Guide and then come back here, it’ll only take you 5 minutes.
Once you’re in your Google Analytics dashboard, click “Admin“, then click “Property Settings“.
Click “Adjust Search Console“, then “Add”. Select your website and click “Save”. That’s it!
Now you’ll want to head to the “Landing Pages” section, and head over to the “Queries” subsection.
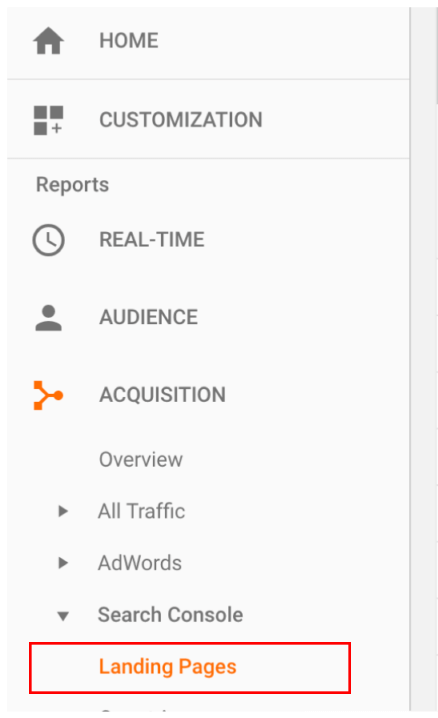
You’ll notice that a big chunk of unprocessed data previously filtered under (other) is now distributed amongst previously hidden keywords.
Understanding how good are keywords are performing in terms of organic traffic is fundamental to any business, (and it’s a big part of the reason we use Google Analytics in the first place!). Having this extra piece of data just by linking our Google Search Console is just too good to pass on.
Now it’s time to add our sitemap. I do this on all the websites I work on, regardless of how big it is just to give Google some extra information.
Note: If you’re a WordPress user, you can just get the Yoast SEO plugin, head over to the “General” tab and switch on the Sitemap option.
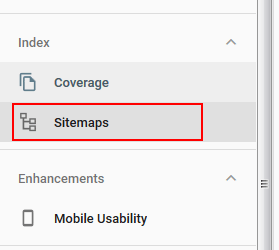
Click the “Sitemaps” tab on your Google Search Console dashboard, then submit your URL.
That’s it! You’ve successfully set up your website’s Google Search Console! Now it’s time to get into some of the more technical aspects that’ll help you grab the top stops in the SERP.
Fixing Errors With Google Search Console
Think of Google Search Console as your technical SEO hub for your websites: the very first line of defense against security, indexation, redirect and crawling issues.
The new Google Search Console comes with some incredibly useful reports that should be part of your website audit process, that way you can guarantee Google is not only able to find your content, but also quickly add it to their index.
To that end, we’re going to start with our most basic report: the index coverage report.
The Index Coverage Report
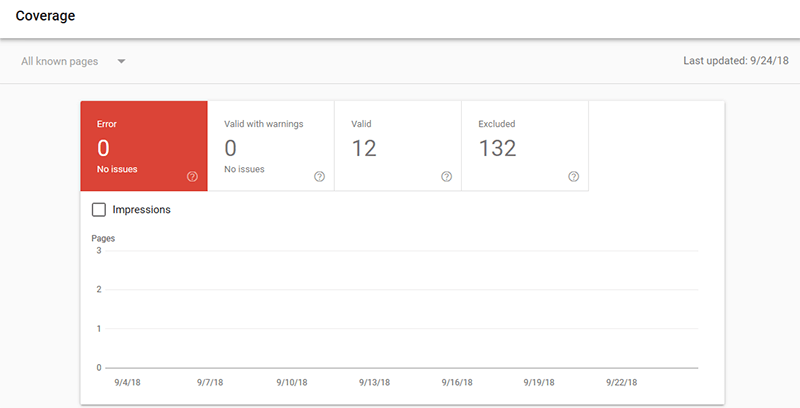
This report will tell you if Google is having any issues when indexing your content. Right off the bat you’ll notice four categories: Error, Valid with Warning, Valid and Excluded

When it comes to possible errors, the most common ones are:
Redirect Error: someone (unsuccessfully) tried to create a redirect for this page. If you’ve tinkered with your .htaccess file on your web server, then these sorts of errors tend to pop up fairly quickly on your Google Search Console.
Submitted URL Not Found (404): For whatever reason, this particular webpage is not accessible. If you try to access it, you’ll see the all too familiar 404 error.
Submitted URL seems to be a Soft 404: The page couldn’t be found. Worth re-scanning to make sure it wasn’t a temporary bug. Could require additional troubleshooting.
Submitted URL has crawl issue: Maybe this page was blocked from spiders in your Robot.txt, or it’s something else entirely. You need to visit this page and see what’s going on.
Server Errors (5XX): Google Spiders couldn’t reach your website’s server. This usually happens when Google tries to crawl your webpage during maintenance hours. I highly suggest you keep track of these errors, since they’re tied to your server’s uptime. Depending on how frequent they are, you might have a problem with your provider.
How To Fix Errors Using your Google Search Console
404 Errors:
You should see a list of URLs that are presenting this issue.
First, you’re going to click “Fetch as Google”
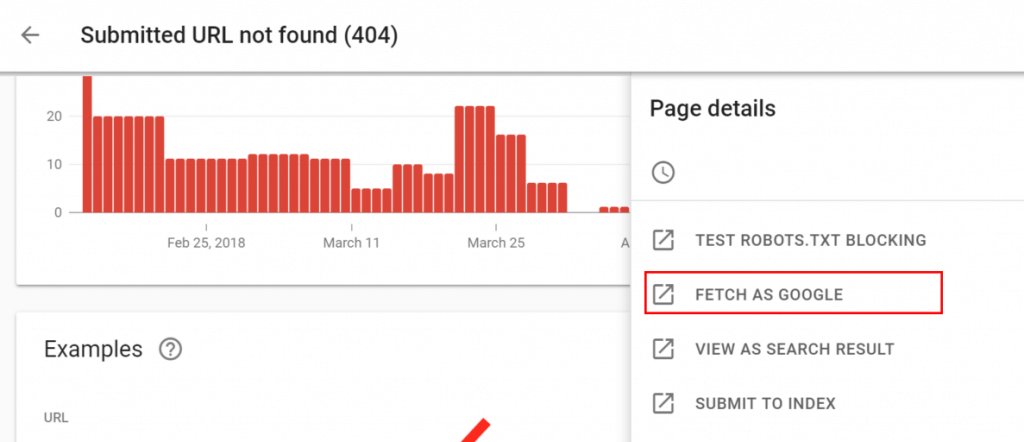
You should automatically get a URL bar, click on “Fetch”
The page should automatically fetch and index the content. If you’re using WordPress, make sure the content is not saved as a “Draft”. If it has indeed been published, and you still can’t access the content, I recommend setting up a redirect to a similar page.
Soft 404 Errors:
Same as before, click on “Fetch As Google“, but instead of clicking “Fetch”, click on “Fetch and Render”
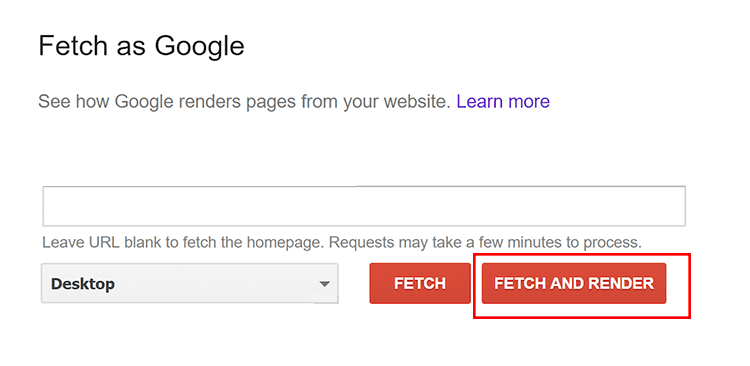
Soft 404 errors are the byproduct of glitches, so it’s important we see what Google “sees”.
If the render is an accurate representation of the content that’s currently published, check a little further down for the resources that Google can’t load. Certain scripts are blocked by default, but if you feel something is off, feel free to Google more information about the script.
Note: You can try to unblock Javascript or Jquery scripts if the render fails.
If you’re using a WordPress theme, feel free to drop the developers a message asking them if certain unknown scripts are necessary for the page to load.
Next, you’ll go into the “Fetching” tab, right next to Rendering.
Look at the first line, if your downloaded HTTP response says “200 OK”, then it means Google was able to find your website, and should be up for indexation next time the spiders visit your website.
You can follow this exact procedure to fix ANY errors on this tab.
Index Coverage Warnings

Most of the warnings you’ll find here are “Errors” that appear when accessing the content. What we mean by “Error” is that, indeed there are issues with the content but your Google Search Console knows exactly what’s wrong and its likely something intentional.
For example, you might encounter an error that says “Indexed, though blocked by robots.txt”
Simple enough, select the URL and click on “Text Robots.TXT Blocking”
You’ll be taken to the Robots.txt Tested tab under the “Crawl” section of your Google Search Console, and it’ll highlight the command that is currently blocking the webpage.
If you’re trying to get this content indexed, you’re going to have to edit your robots.txt file in your server and delete that specific line of command. Simple enough.
Index Coverage Valid Report

The third tab, “Valid” you’ll see how many pages have been indexed throughout time. Check that the total number of pages that have currently been indexed is close to the total number of pages that you’ve published.
If the number is way higher than it should be, check for duplicate content, or copies you’ve accidentally published.
Index Coverage Excluded Report

Here, you’ll find all the pages Google didn’t index for any number of reasons.
Some of your content might have a canonical version, so these “duplicates” are correctly excluded, some might be getting blocked from robots.txt.
You should only be concerned with Crawl Anomalies, since those will require further investigations (using the method descripted above for Soft 404 Errors), or even talking with your hosting provider to make sure everything is in order.
Also check for “Crawled – currently not indexed” errors. If you see checkout pages listed here, that’s alright. But if there’s actual content you want listed in the Search Engine Results pages, make sure it has original content that has been thoroughly developed. Thin content (under 300 words) gets filtered here.
Google Search Console Performance Report
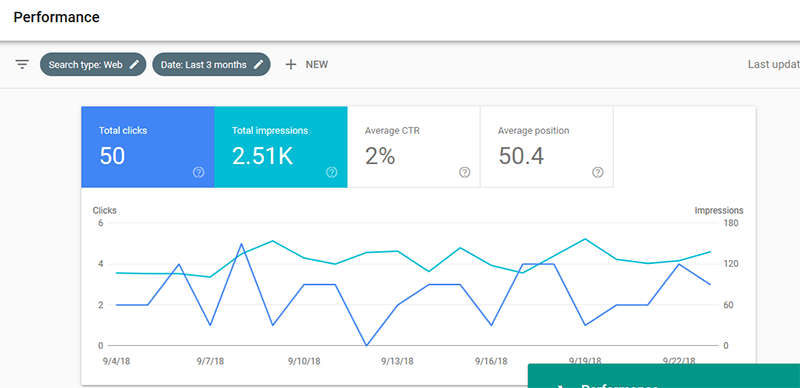
The performance report in your Google Search Console dashboard gives you a complete rundown on how many clicks, impressions, click through rate and rankings for your pages for the past 16 months, which is a huge upgrade from the initial 3 months we had with the old “Search Analytics”.
Clickthrough rate (CTR) is an important ranking factor since it directly relates to user experience, here’s how it goes:
- User types a query into Google
- The Search Engine Results Page (SERP) lists a bunch of results
- User quickly looks at the websites description, and clicks the #3 result
- Google interprets that this result is the most satisfactory for this query. Over time, this trend stays and the #3 result jumps to #1
And it just so happens Google Search Console performance report is amazing for spotting CTR optimization opportunities and tweaks.
We recently published a complete guide to Landing Page Optimization, which we highly suggest you take a look at if you really want to crank your conversions to the max, but for now we’re going to show you how to filter this information quickly with your dashboard.
Filtering by Position
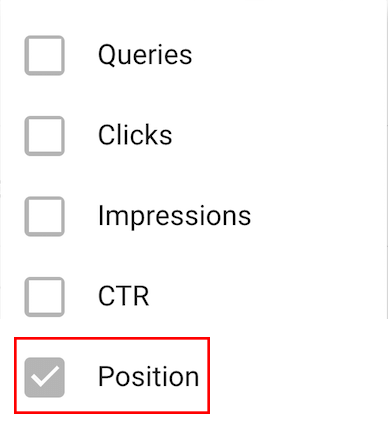
Click on the “Position Box”, then set it to “7”
You should see your clicks, impressions and CTR measures.

First take a look at your impressions: a high impression number, and a low clickthrough rate means you need to optimize your meta title and meta descriptions. Consider poaching paid aids descriptions, or customizing it so that it draws more attention from users.

Now, take a look at your CTR. As a general rule of thumb, once you break the top 10 results in the search engine results page for any keyword, you’ll want at least 2% CTR. The closer you get to the top, then the better you’ll need to do (for example, if you’re on the top 3 results, you’ll need to aim for 10% CTR).
Like with anything else in life, the closer you get to the top, the harder it’ll get. Exponentially harder. So, track this report regularly and see how your content is doing.
Getting specific data to see if your changes are getting any results takes time, feel free to check back in a couple of weeks and check for improvements or shifts.
To get a complete comparison, select one of your pages, they keyword you optimized for, then click on the date filter, and click “Compare”
Set a date range using the little calendar icons, and compare it to the last 15 days.
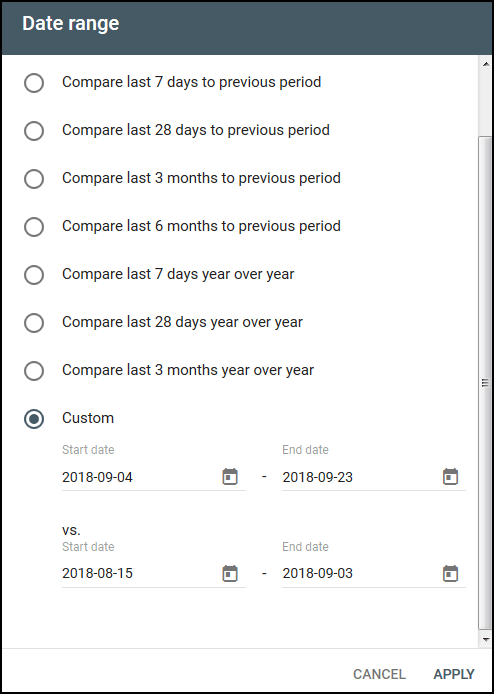
Excellent! Now you’ll be able to monitor if your conversion optimization efforts are working for you without even having to log into Google Analytics.
Extra Tip: Index Your Content With GSC
As a closing tip, we’re going to give you a fairly unknown trick we use a lot to index our content ASAP.
For this, we’re going to use the old Google Search Console.
In the Crawl tab, click the “Fetch as Google” section.
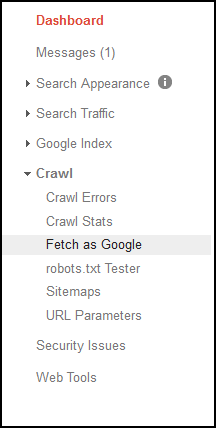
Enter your URL into the bar. Then click “Fetch”
And now for the finishing touch: Click the “Request Indexing” button followed by the “Crawl Only This URL“.
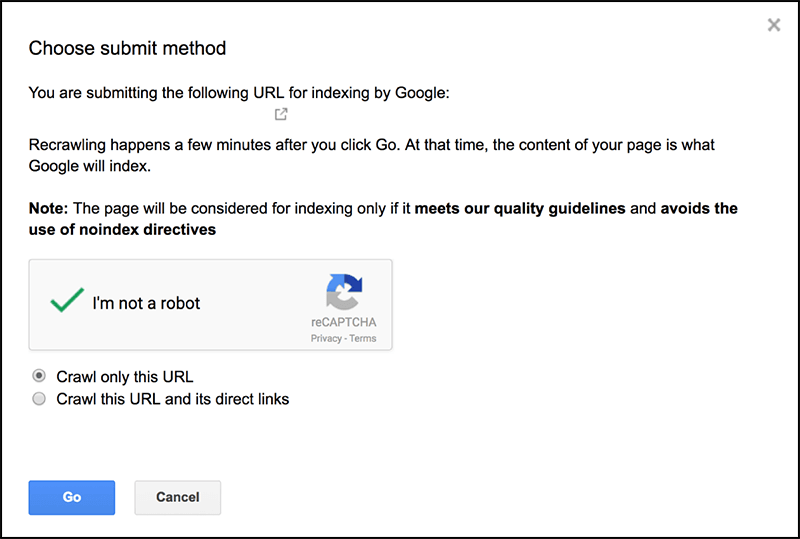
Solve the captcha, and press “Go”
That’s all! If you have a fairly important piece of content you need indexed ASAP, this is the fastest way to do so.
Closing Words:
Thank you for making it this far! As you can no doubt see, Google Search Console is an amazing tool for site audits, context indexation and analytics. Any SEO worth their salt should include it as part of their arsenal. We highly suggest you check out some of the other reports Google Search Console has to offer and experiment with them.
Also, be sure to add any other websites you might own with the “add property” button, so you can easily navigate through your different domains quickly. Good luck!


